| Master/child Dialogs | Validation | |
 This feature is only supported in the 'Ajax .Net Web Browser Deployment' and the 'Javascript Web Browser Deployment' types.
Form Rules are used to define any dependencies that exist between elements on the same Dialog, covering both Objects (Attributes) and Controls (e.g. Labels & Buttons).
For example, if the selection of particular List Attribute value was to cause another List Attribute on the same dialog (and the Label control associated with it) to become invisible.
Note that any change of setting in the THEN clause is only for the duration of the display of the Dialog who has the Form Rule. For example if the visibility of an Attribute is changed then this will not be reflected when the same Attribute is captured by a later Dialog.
The editor for a Dialog object has two tabs on the right-hand side – the Form Design Editor  and the Form Rules Editor
  .
.
Using the toolbar on the Form Rules Editor allows rules to be added to that particular Dialog object.

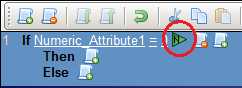
To add a rule press the mini icon  in the toolbar and then define the conditions and the actions
  using the selections in the rule builder. The objects used for the conditions are the attributes currently used in the dialog, the objects used for the actions can be either the attributes or the controls currently used in the dialog. Multiple conditions and actions by repeatedly using
  .
.
The rules are fired in order from top to bottom after any dialog update. All the rules which have their conditions satisfied will have their actions fired. As the rules are fired in order from top to bottom it is sometimes necessary to change the order this can be achieved by using the mini icons  'Move Selected Rule Down' and '
 Move Selected Rule Up'.
When using Form Rules it is good practice to use Text objects and Numeric objects on dialogs as opposed to String variables and Numeric variables as the dialog controls associated with these later objects can't be controlled in the Actions.
Form Rule Construction
Conditions can be constructed from Boolean, Numeric, List and Date objects. All of these objects can be compared with their rutnime values or whether they have a value ('is Blank', 'is Not Blank').
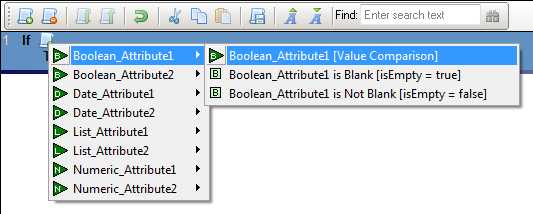
Boolean objects can be compared to their values True or False with the operator =; List obejcts can be compared to their predefined values with the operators =, <>; Numerics and Date objects can be compared with literal values with the operators =, <>, <, <=, >, >=. In addition Numeric and Date objects can be compared with other objects of the same data type, by clicking the highlighted icon converting the condition into an object/object comparison.
Objects that are not on the dialog will not appear automatically on object selection menus during rule building (during the selection of objects on the left hand side of the operator), but objects that are not on the dialog can be included by simply dragging them from the explorer view directly into the rule editor.
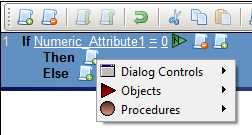
Actions are constructed in a similar way to conditions except the objects that can be included extend to the dialog controls and procedures.
Dialog controls will be named appropriately when they are placed on a dialog, for example the label associated with the 'Numeric_Attribute1' will have its 'Name' property set to 'Numeric_Attribute1_label' this makes it easier for the developer to select the desired control in the condition. If the 'Name' property is subsequently changed then that will be propogated through the rules. Labels and images can be set to 'Visible' or 'Invisible', buttons can be set to 'Visible', 'Invisible', 'Enabled', or 'Disabled', tabs can have their pages made 'Visible' or 'Invisible'.
Actions can be constructed from Boolean, Numeric, List, Date and Text objects. All of these objects can be set by value assignment, or have their object control properties set ('Allowed to be Blank', 'Not allowed to be Blank', 'Show and Edit', 'Read-Only', 'Valid', 'Invalid', 'Visible', 'Invisible'). For List objects this is extended to allow the runtime values to hiden or shown with 'Show Instance' and 'Hide Instance'.
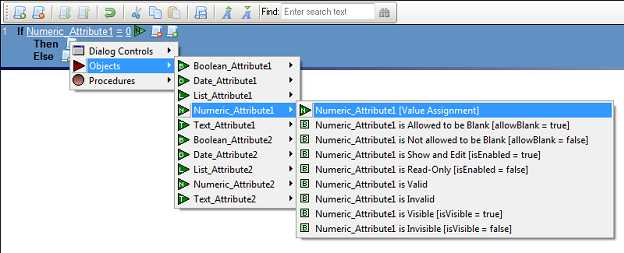
Procedures will be listed for possible selection as the action.
The 'Else' section of the rule can be automatically constructed by pressing the icon  (auto-populate else action), this selects the opposite statement from the 'Ther' section where possible.
When the rules has the focus the editing icons will appear,
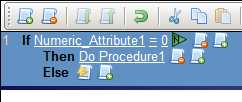
when the rule has lost the focus it will appear without the editing icons.
Form Rule Toolbar

 Add New Rule: This will add a new rule to the bottom of the ruleset.
 Delete Selected Rule: Highlight the rule and select this icon to remove the rule.
 Move Selected Rule Down: Highlight the rule and select this icon to move the chosen rule down one place (greyed out when at the bottom of the ruleset)
 Move Selected Rule Up: Highlight the rule and select this icon to move the chosen rule up one place (greyed out when at the top of the ruleset).
 Undo Last Operation: Reverses the last action, for example restores a deleted rule if that was the last action (Ctrl + Z)
 Cut Selected Rule to Clipboard: Highlight the rule and select this icon to cut the rule to the clipboard.
 Copy Selected Rule to Clipboard: Highlight the rule and select this icon to copy the rule to the clipboard
 Paste Selected Rule from Clipboard: This will paste the rule from the clipboard at the bottom of the ruleset.
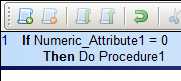
 Save Rules to File: This will save the rules to a user selected text file, for example;
Rule #1
If Numeric_Attribute1 = 0
Then Boolean_Attribute1 = True
 Increase Font Size: The size of the text of the rules can be increased.
 Decrease Font Size: The size of the text of the rules can be decreased.
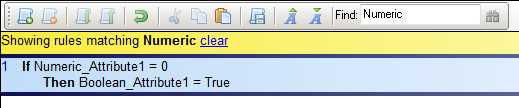
 Find Text in Rules: This will locate objects/values within the ruleset.